Oh My! I can't believe it has been a month since my last post!
Here is Isabelle all finished. I added a blanket stitch to the jacket, gave her a little stockinette scarf and crocheted her a pair of Mary Janes.
The birthday girl was very excited and loves her new doll.
Isabelle is a 12" doll. Here you can see her next to Amelia who is an 18" doll.
It has been a few weeks since my daughter received Isabelle and as much as she loves her she seems to prefer playing with her larger dolls and has requested a friend for Ella for Christmas.
Here are Amelia and Isabelle sitting together. Oh, I haven't introduced you to Amelia yet. My next post will have to be about her. She has some very exciting news!
Tuesday, November 20, 2012
Thursday, October 18, 2012
Almost Finished
She is Almost done! As I mentioned in my previous blog I'm making a new doll for my daughters birthday.
This time I wanted to make a smaller doll that could fit in her hand.
Here she is next to Ella. Ella is about 16" so Isabelle is about 12". I gave her little ears and bendy knees.
For her hair I started with a crocheted wig cap. Then I hand stitch layers of yarn to the cap.
I like to make the hair in layers so my daughter can give her any hairstyle. She likes to change her dolls hair a lot!
This is what the back looks like when the hair is pulled up.
Around the face I like to hook the yarn.
Last year I saw a beautiful doll with wavy hair and I new I wanted to try it. You can see the doll here http://www.flickr.com/photos/juli_velo_poupee/5995274340/in/faves-fromthelandofbrung/
at Juli's photostream. She was so nice to share how she made it so wavy. After the yarn is attatched each piece of yarn is unwound.
It takes a lot of time, but it's so pretty it's definitely worth it.
Now she's almost finished. I designed her a little cotton calico dress with hook and eye closer in the back.
I knitted her little yellow beret out of Cascades 220 Superwash Wool. It was originally for another project but I thought the colour went well with the brown dress.
I still need to finish the coat. I want to put a blanket stitch around it and I'm trying to knit a matching scarf. That part isn't going so well. She may end up scarfless :(
Then the last thing I will need to do is make her little felt shoes. I will post more pictures when she is totally finished.
This time I wanted to make a smaller doll that could fit in her hand.
Here she is next to Ella. Ella is about 16" so Isabelle is about 12". I gave her little ears and bendy knees.
For her hair I started with a crocheted wig cap. Then I hand stitch layers of yarn to the cap.
I like to make the hair in layers so my daughter can give her any hairstyle. She likes to change her dolls hair a lot!
This is what the back looks like when the hair is pulled up.
Around the face I like to hook the yarn.
Last year I saw a beautiful doll with wavy hair and I new I wanted to try it. You can see the doll here http://www.flickr.com/photos/juli_velo_poupee/5995274340/in/faves-fromthelandofbrung/
at Juli's photostream. She was so nice to share how she made it so wavy. After the yarn is attatched each piece of yarn is unwound.
It takes a lot of time, but it's so pretty it's definitely worth it.
Now she's almost finished. I designed her a little cotton calico dress with hook and eye closer in the back.
I knitted her little yellow beret out of Cascades 220 Superwash Wool. It was originally for another project but I thought the colour went well with the brown dress.
I still need to finish the coat. I want to put a blanket stitch around it and I'm trying to knit a matching scarf. That part isn't going so well. She may end up scarfless :(
Then the last thing I will need to do is make her little felt shoes. I will post more pictures when she is totally finished.
Labels:
beret,
calico,
Ella,
Handmade Doll,
Isabelle,
knit,
Steiner,
Steiner doll,
Waldorf,
Waldorf doll,
wool stuffing
Sunday, October 7, 2012
Owl Needle Case
Well, the gift I am working on for my daughter is taking a little longer than expected. I hope to be able to post about it soon. In the meantime I got a little side tracked because I have a bad habit of misplacing my needles :( So I decided to make a needle case.
On the inside cover I can keep my threaded needles. Which makes it easier when I'm switching between colours.
On the back cover I made a little pocket for my embroidery scissors; the middle sections I use for my unthreaded needles and a pin. I always seem to need a pin for something.
It didn't take long to make, and now I can find my needles and scissors when I need them. Yea!
My daughter wants to make one too, so I'm going to try and draw up a pattern for her.
On the inside cover I can keep my threaded needles. Which makes it easier when I'm switching between colours.
On the back cover I made a little pocket for my embroidery scissors; the middle sections I use for my unthreaded needles and a pin. I always seem to need a pin for something.
It didn't take long to make, and now I can find my needles and scissors when I need them. Yea!
My daughter wants to make one too, so I'm going to try and draw up a pattern for her.
Thursday, September 27, 2012
Trio
Here is the Trio I made for my son's Christmas present. They are about the same size as the girls I made for my daughter and of course they are designed by Gingermelon. You can find the patterns at her Etsy shop http://www.etsy.com/listing/109934410/pocket-pets-pdf-pattern-you-choose-two
They are all so cute I will have to eventually make them all.
Even though the Fox and Dog are girls in the pattern it was super easy to make them into boys. I just left off the eyelashes and put them in a shirt and shorts.
Well Gingermelon week has been about 2 weeks and though I will be moving onto some other exciting projects I know I will have to get more Gingermelon patterns in the future.
Things I have learned through this process.
1. I really like using wool blend felt. The felt from Benzie Bazaar is an heirloom quality merino blend that is soft to the touch and holds it's shape. http://www.etsy.com/shop/BenzieBazaar
2. Buy the colour chart. I was never quite sure if I was picking the right colour by looking online and had to email Shelly (Gingermelon) several times to find the right one. She was wonderful at sharing the colours, Thank You !!.If your computer screen is colour balanced this may not be a problem, but I love seeing the actual pieces of felt and am much happier now that I own this.
3. When working with felt you want to make sure your edges are cut very smooth. I found using applique scissors (right side) worked best for me.
4.Since I work at my kitchen table having somewhere to store my projects is essential. The top right corner is the container I use. one side is a large zipper compartment. I like to keep my wool stuffing there. The other zipper compartment has alot of little zippered areas where I keep patterns, notions , needdles ect.
5. Little paper pieces are easy to lose! I now put each set of patterns in it's own snack size ziplock bag.
I love using wool for stuffing. The wool retains body heat so the dolls are extra warm and cuddly.The wool I use is from Weir Crafts http://www.weirdollsandcrafts.com/waldorf-dollmaking-supplies/wool-stuffing.html
I like that it is sustainably grown wool that's exceptionally clean of chemicals and pesticides.
By the way I don't get compensated by any of the companies I blog about. I just know when I'm reading a blog and there is a project I want to try I want to know the specific materials and resources they use, so I always try share that info.
They are all so cute I will have to eventually make them all.
Even though the Fox and Dog are girls in the pattern it was super easy to make them into boys. I just left off the eyelashes and put them in a shirt and shorts.
Well Gingermelon week has been about 2 weeks and though I will be moving onto some other exciting projects I know I will have to get more Gingermelon patterns in the future.
Things I have learned through this process.
1. I really like using wool blend felt. The felt from Benzie Bazaar is an heirloom quality merino blend that is soft to the touch and holds it's shape. http://www.etsy.com/shop/BenzieBazaar
2. Buy the colour chart. I was never quite sure if I was picking the right colour by looking online and had to email Shelly (Gingermelon) several times to find the right one. She was wonderful at sharing the colours, Thank You !!.If your computer screen is colour balanced this may not be a problem, but I love seeing the actual pieces of felt and am much happier now that I own this.
3. When working with felt you want to make sure your edges are cut very smooth. I found using applique scissors (right side) worked best for me.
4.Since I work at my kitchen table having somewhere to store my projects is essential. The top right corner is the container I use. one side is a large zipper compartment. I like to keep my wool stuffing there. The other zipper compartment has alot of little zippered areas where I keep patterns, notions , needdles ect.
5. Little paper pieces are easy to lose! I now put each set of patterns in it's own snack size ziplock bag.
I love using wool for stuffing. The wool retains body heat so the dolls are extra warm and cuddly.The wool I use is from Weir Crafts http://www.weirdollsandcrafts.com/waldorf-dollmaking-supplies/wool-stuffing.html
I like that it is sustainably grown wool that's exceptionally clean of chemicals and pesticides.
By the way I don't get compensated by any of the companies I blog about. I just know when I'm reading a blog and there is a project I want to try I want to know the specific materials and resources they use, so I always try share that info.
This is Peter the Dog,
Flash the Cat, (named after our own striped cat)
and David the Fox. I so wish we had a fox!
I hope everyone enjoyed Gingermelon week(s)!
My daughter has a birthday coming up in November my next blog will feature something I designed for her :)
Friday, September 21, 2012
Friends
Did anybody guess Cotton Candy Dolls?
My daughter loves dolls that she can hold in her hand and play with. When I saw the Cotton Candy dolls at Gingermelon's Etsy shop I fell in love with these girls and their wool felted hair. I knew instantly that I would have to make one. The pattern can be found here Cotton Candy Doll Pattern
I thought it would be fun if these three friends had eyes that matched their dresses. So I used the same iridescent safety eyes I used on my crochet dolls. You can read more about the eyes on my post Here.
This is Paige I used Oat coloured felt for her body and Swan colored felt for her dress.
I put her hair up in high pigtails.
Here is a view from the back.

Next I made Allison. Her body is made from Cinnamon coloured felt and her dress is Fern.
I put her hair in low pig tails and I gently needled the ends into little puffs.
Finally I made Maria. Her body is toast coloured felt and her dress lavender.
I gathered her hair back into a low bun and needle felted it firmly in place.
I didn't use woven felt for the clothing. So even though I put snaps under the buttons of the overalls it will be hard to take them on and of several times with out them pulling out of shape.
If that happens I guess I will have to get some woven felt and make her a new dress. :)
Again the patterns and directions from Gingermelon were great. And included how to needle felt hair onto the doll, which I had never done before. The application instructions were wonderful and I had fun playing with different hairstyles.
These are great dolls to make for either beginning or more experienced doll makers.
Since I made presents for my daughter I also needed to make some for my son.
So which Gingermelon patterns do you think I used?
My daughter loves dolls that she can hold in her hand and play with. When I saw the Cotton Candy dolls at Gingermelon's Etsy shop I fell in love with these girls and their wool felted hair. I knew instantly that I would have to make one. The pattern can be found here Cotton Candy Doll Pattern
I thought it would be fun if these three friends had eyes that matched their dresses. So I used the same iridescent safety eyes I used on my crochet dolls. You can read more about the eyes on my post Here.
This is Paige I used Oat coloured felt for her body and Swan colored felt for her dress.I put her hair up in high pigtails.
Here is a view from the back.

Next I made Allison. Her body is made from Cinnamon coloured felt and her dress is Fern.
I put her hair in low pig tails and I gently needled the ends into little puffs.
Finally I made Maria. Her body is toast coloured felt and her dress lavender.
I gathered her hair back into a low bun and needle felted it firmly in place.
I didn't use woven felt for the clothing. So even though I put snaps under the buttons of the overalls it will be hard to take them on and of several times with out them pulling out of shape.
If that happens I guess I will have to get some woven felt and make her a new dress. :)
Again the patterns and directions from Gingermelon were great. And included how to needle felt hair onto the doll, which I had never done before. The application instructions were wonderful and I had fun playing with different hairstyles.
These are great dolls to make for either beginning or more experienced doll makers.
Since I made presents for my daughter I also needed to make some for my son.
So which Gingermelon patterns do you think I used?
Tuesday, September 18, 2012
Gingermelon Gingermen
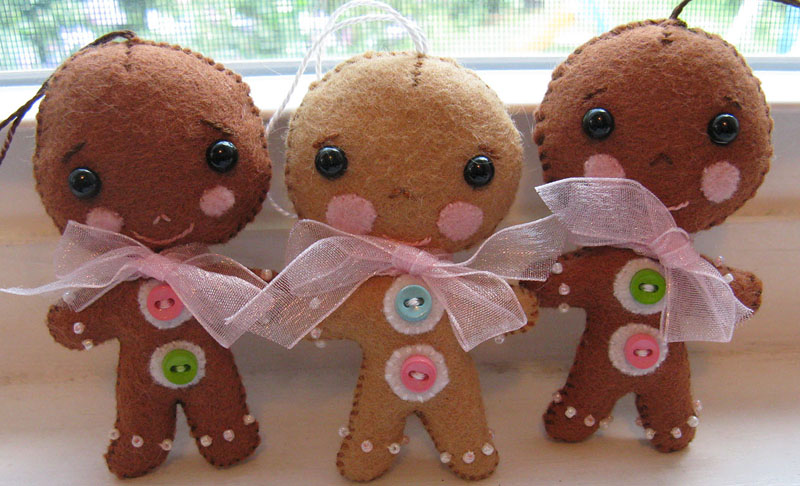
The first dolls I made using Gingermelon patterns are these adorable little gingermen.
Every year at Christmas time two of my friends and I get together with our children and make gingerbread houses. Last year we decided it would be fun to make ornaments for each other. When I saw these little guys I knew they would be perfect.
The pattern can be found at Gingermelon's Etsy shop
She emailed me the pattern in less than 24 hours and has answered all my questions very graciously.
The pattern itself was easy to follow and alot of fun to make.
I do have a hard time with the safety eyes though. If they weren't so cute I would stop using them. It just kills my fingers to squeeze them together. Does anyone know an easier way? Am I doing something wrong?
I used a merino wool blend felt by Benzie Bazaar
I used the colour cinnamon for the outside men and toast for the one in the middle.This was the first time I have used a wool blend, I have used 100% wool felt previously. I really like the feel of this wool it has a smoother touch and holds it shape very nicely. Benzie Bazaar shipped the felt out right away and I was able to start crafting in a couple of days.Which is great for me, I tend to get antsy when waiting to start a craft project.
The gingermen are trimmed with tiny buttons I found at Jo-Ann Fabrics, pink and white glass seed beads and a pink organza ribbon.
Well I couldn't just stop at one Gingermelon pattern. Guess what I made next?
Monday, September 17, 2012
Gingermelon Week
Now that I've finished blogging about the Christmas presents I made last year, I'm going to start sharing this years projects.
I found the most darling patterns at Gingermelon's shop on Etsy http://www.etsy.com/shop/Gingermelon?ref=seller_info
and just had to make some.
This week I will share my finished Gingermelon projects.
As providence will have it I checked her blog today and found this http://gingermelondolls.blogspot.com/2012/09/a-little-present-for-you-to-download.html
So Gingermelon week starts with a free doll pattern!
The faces are so sweet I just want to hug them :)
I can't wait to make one, but I need to find some cotton linen blend fabric first. If anyone has suggestions please leave them in the comment section.
Thank You Shelly for your wonderful generosity!
I found the most darling patterns at Gingermelon's shop on Etsy http://www.etsy.com/shop/Gingermelon?ref=seller_info
and just had to make some.
This week I will share my finished Gingermelon projects.
As providence will have it I checked her blog today and found this http://gingermelondolls.blogspot.com/2012/09/a-little-present-for-you-to-download.html
So Gingermelon week starts with a free doll pattern!
The faces are so sweet I just want to hug them :)
I can't wait to make one, but I need to find some cotton linen blend fabric first. If anyone has suggestions please leave them in the comment section.
Thank You Shelly for your wonderful generosity!
Subscribe to:
Posts (Atom)